Uyuni Server Setup
This section covers Uyuni Server setup, using these procedures:
-
Start Uyuni setup with YaST
-
Create the main administration account with the Uyuni Web UI
-
Name your base organization and add login credentials
-
Synchronize the SUSE Linux Enterprise product channel from SUSE Customer Center
1. Set up Uyuni with YaST (Legacy)
This section will guide you through Uyuni setup procedures.
-
Log in to the Uyuni Server and start YaST.
-
In YaST, navigate to to begin the setup.
-
From the introduction screen select and click Next to continue.
-
Enter an email address to receive status notifications and click Next to continue. Uyuni can sometimes send a large volume of notification emails. You can disable email notifications in the Web UI after setup, if you need to.
-
Enter your certificate information and a password. Passwords must be at at least seven characters in length, and must not contain spaces, single or double quotation marks (
'or"), exclamation marks (!), or dollar signs ($). Always store your passwords in a secure location.You must have the certificate password to set up the Uyuni Proxy.
-
Click Next to continue.
-
From the screen, enter a database user and password and click Next to continue. Passwords must be at at least seven characters in length, and must not contain spaces, single or double quotation marks (
'or"), exclamation marks (!), or dollar signs ($). Always store your passwords in a secure location. -
Click Next to continue.
-
Click Yes to run setup when prompted.
-
When setup is complete, click Next to continue. You will see the address of the Uyuni Web UI.
-
Click Finish to complete Uyuni setup.
2. Create the Main Administration Account
This section covers how to create your organization’s main administration account for Uyuni.
|
In container-based deployments, the administration account is established as part of the deployment process, rendering this step useful exclusively to legacy installations. |
|
The main administration account has the highest authority within Uyuni. Ensure you keep access information for this account secure. We recommend that you create lower level administration accounts for organizations and groups. Do not share the main administration access details. |
|
Newer browser versions can block web access to the Uyuni Server FQDN because of HSTS. Installing the CA certificate from the
|
-
In your web browser, enter the address for the Uyuni Web UI. This address was provided after you completed setup. For more information, see Set up Uyuni with YaST (Legacy).
-
Log in to the Web UI, navigate to the field, and enter your organization name.
-
In the and fields, enter your username and password.
-
Fill in the Account Information fields including an email for system notifications.
-
Click Create Organization to finish creating your administration account.
When you have completed the Uyuni Web UI setup, you are taken to the page.
3. Optional: Synchronizing Products from SUSE Customer Center
SUSE Customer Center (SCC) maintains a collection of repositories which contain packages, software and updates for all supported enterprise client systems. These repositories are organized into channels each of which provide software specific to a distribution, release, and architecture. After synchronizing with SCC, clients can receive updates, be organized into groups, and assigned to specific product software channels.
This section covers synchronizing with SCC from the Web UI and adding your first client channel.
|
For Uyuni, synchronizing products from SUSE Customer Center is optional. |
Before you can synchronize software repositories with SCC, you will need to enter organization credentials in Uyuni. The organization credentials give you access to the SUSE product downloads. You will find your organization credentials in https://scc.suse.com/organizations.
Enter your organization credentials in the Uyuni Web UI:
-
In the SUSE Multi-Linux Manager Web UI, navigate to .
-
In the
Setup Wizardpage, navigate to the Organization Credentials tab. -
Click Add a new credential.
-
Enter a username and password, and click Save.
A check mark icon is shown when the credentials are confirmed. When you have successfully entered the new credentials, you can synchronize with SUSE Customer Center.
-
In the Uyuni Web UI, navigate to .
-
From the
Setup Wizardpage select the SUSE Products tab. Wait a moment for the products list to populate. If you previously registered with SUSE Customer Center a list of products will populate the table. This table lists architecture, channels, and status information. For more information, see Wizard.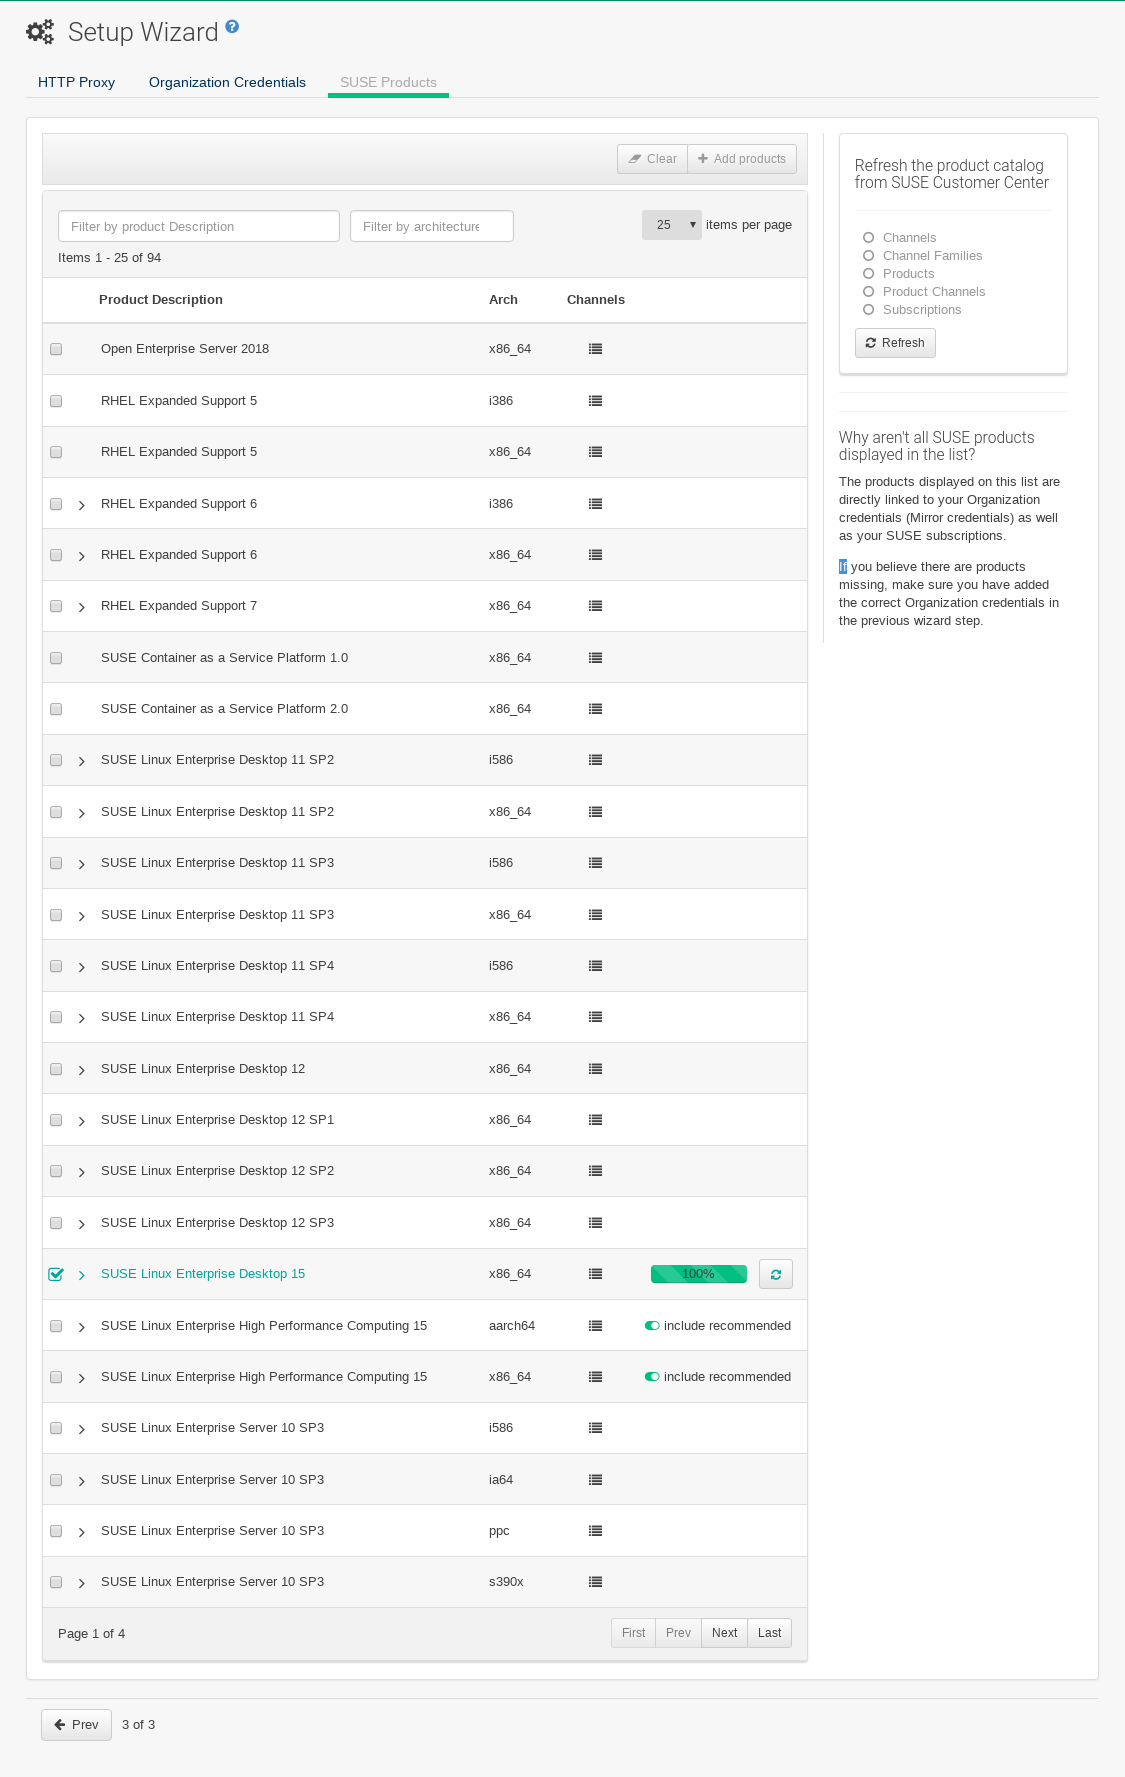
-
If your SUSE Linux Enterprise client is based on
x86_64architecture scroll down the page and select the check box for this channel now.-
Add channels to Uyuni by selecting the check box to the left of each channel. Click the arrow symbol to the left of the description to unfold a product and list available modules.
-
Click Add Products to start product synchronization.
After adding the channel, Uyuni will schedule the channel to be synchronized. This can take a long time as Uyuni will copy channel software sources from the SUSE repositories located at SUSE Customer Center to local
/var/spacewalk/directory of your server.In some environments, transparent huge pages provided by the kernel can slow down PostgreSQL workloads significantly.
To disable transparent huge pages, set the
transparent_hugepagekernel parameter tonever. You will also need to open the/etc/default/grubfile and add or edit the lineGRUB_CMDLINE_LINUX_DEFAULT. For example:GRUB_CMDLINE_LINUX_DEFAULT="resume=/dev/sda1 splash=silent quiet showopts elevator=none transparent_hugepage=never"
To write the new configuration run
grub2-mkconfig -o /boot/grub2/grub.cfg.Monitor the channel synchronization process in real-time by viewing channel log files located in the directory
/var/log/rhn/reposync:tail -f /var/log/rhn/reposync/<CHANNEL_NAME>.log
When the channel synchronization process is complete, you can continue with client registration. For more instructions, see Client Registration.
-