Salt SSH
Salt SSH allows Salt commands and states to be issued directly over SSH. SSH connections are created on demand, when the server executes an action on a client.
For more information about Salt SSH, see https://docs.saltproject.io/en/latest/topics/ssh/.
1. SSH Connection Methods
In Uyuni there are two SSH connection methods, ssh-push and ssh-push-tunnel.
In both methods the server initiates an SSH connection to the client to execute a Salt call.
In the ssh-push method, the package manager works as normal, and the HTTP or HTTPS connection is directly created.
In the ssh-push-tunnel method, the server creates an HTTP or HTTPS connection through an SSH tunnel.
The HTTP connection initiated by the package manager is redirected through the tunnel using /etc/hosts aliasing.
Use this method for in-place firewall environments that block HTTP or HTTPS connections between server and client.
2. Salt SSH Integration
As with all Salt calls, Uyuni invokes salt-ssh via the salt-api.
Salt SSH relies on a roster to obtain details such as hostname, ports, and the SSH parameters of a client.
Uyuni keeps these details in the database and makes them available to Salt SSH by using the uyuni roster module, or by generating a temporary roster file on bootstrapping new clients with the Web UI.
The location of the temporary roster file is supplied to Salt SSH using the roster-file option.
For the registered clients roster set to uyuni is used instead to get the roster from the database with uyuni salt roster module.
|
It is not recommended to run |
mgr-salt-ssh uses roster set to uyuni by default, if neither roster nor roster-file specified in the command line.
It helps to call Salt commands to the registered Salt SSH clients with no roster file generation.
3. Authentication
Salt SSH supports both password and key authentication. Uyuni uses both methods:
Password authentication is used only when bootstrapping. During the bootstrap step the key of the server is not authorized on the client and therefore a password must be used for a connection to be made. The password is used transiently in a temporary roster file used for bootstrapping and the roster file is removed on finishing processing the event. This password is not stored.
All other common Salt calls use key authentication.
During the bootstrap step the SSH key of the server is authorized on the client and added to the client /.ssh/authorized_keys file.
Subsequent calls no longer require a password.
4. User Account
The user for Salt SSH calls made by Uyuni is taken from the ssh_push_sudo_user setting.
By default, the user is root.
|
If bootstrapping with default settings fail, check whether the client allows root login with ssh. |
If the value of ssh_push_sudo_user is not root, then the --sudo options of salt-ssh are used.
For this user you must configure the NOPASSWD option in the sudoers file.
At least, set the python binary with the version number; for example:
<USER> ALL=(ALL) NOPASSWD:/usr/bin/python3.6
5. HTTP Redirection
The ssh-push-tunnel method requires traffic to be redirected through an SSH tunnel.
This allows traffic to bypass firewalls blocking a direct connection between the client and the server.
This is achieved by using port 1233 in the repository URL:
https://MLM-server:1233/repourl...
You can alias the MLM-server hostname to localhost in /etc/hosts:
127.0.0.1 localhost MLM-server
The server creates a reverse SSH tunnel that connects localhost:1233 on the client to MLM-server:443:
ssh ... -R 1233:MLM-server:443
This means that the package manager will actually connect to localhost:1233, which is then forwarded to MLM-server:443 by the SSH tunnel.
The package manager can contact the server only if the tunnel is open, which occurs only when the server executes an action on the client.
Manual package manager operations that require server connectivity are not possible in this case.
6. Call Sequence
Salt SSH calls run in this sequence:
-
Set
rosterparameter touyunifor registered clients or prepare the Salt roster on bootstrapping for the call-
Create remote port forwarding option if the contact method is
ssh-push-tunnel -
Compute the
ProxyCommandif the client is connected through a proxy -
Create Roster content
-
-
Create a temporary roster file (only in case of bootstrapping new client)
-
Execute a synchronous
salt-sshcall using the API -
Remove the temporary roster file (only in case of bootstrapping new client)
The roster content contains:
-
hostname -
user -
port -
remote_port_forwards: The remote port forwarding SSH option -
ssh_options: Other ssh options:-
ProxyCommand: If the client connects through a proxy
-
-
timeout: defaults to 180 seconds -
minion_opts:-
master: Set to the minion ID if the contact method isssh-push-tunnel
-
-
ssh_pre_flight: The path to the shell script executed on the client before running any Salt command -
ssh_pre_flight_args: The list of arguments to call the pre flight script on the client
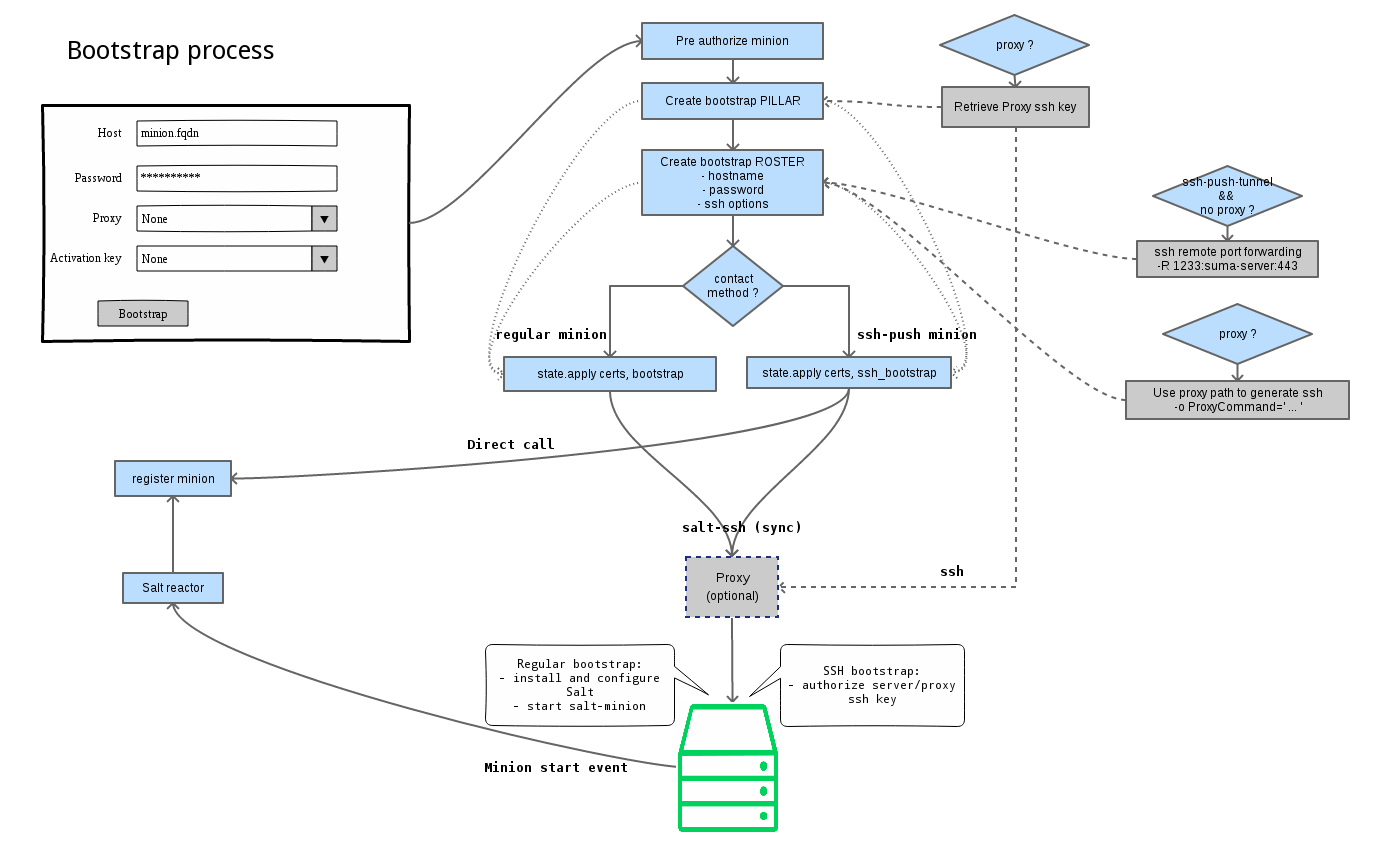
7. Bootstrap Sequence
This section describes the sequence of events when clients are registered to a Salt master. While bootstrapping is a type of Salt SSH call, the sequence differs slightly from regular SSH calls.
Bootstrapping uses Salt SSH for communication between the master and the client. This happens for both regular and SSH clients.
-
For a regular Salt client, generate and pre-authorize the Salt key of the client.
-
For an SSH client, if a proxy was selected, retrieve the SSH public key of the proxy using the
mgrutil.chain_ssh_cmdrunner. The runner copies the public key of the proxy to the server using SSH. If needed, it can chain multiple SSH commands to reach the proxy across multiple hops. -
Generate pillar data for bootstrap. The pillar data is compiled and stored on the Salt master, and retrieved by the client.
-
Generate the roster for bootstrapping into a temporary file on the client. You can use the roster by passing it to the Salt API, with this command:
mgr-salt-ssh --roster-file=<temporary_bootstrap_roster> minion state.apply certs,<bootstrap_state>`
For
bootstrap_state, usebootstrapfor regular clients orssh_bootstrapfor SSH clients.
The way the client retrieves the pillar data depends on the contact method you have chosen for your client:
-
If you are using the
ssh-push-tunnelcontact method, ensure you have completed the remote port forwarding option. -
If the client connects through a proxy, ensure you have completed the
ProxyCommandoption. This depends on your proxy configuration, including how many proxies you need to connect through.
Pillar data contains:
-
mgr_server: The hostname of the Salt master
-
mgr_origin_server: The hostname of the Uyuni Server
-
minion_id: The hostname of the client to bootstrap
-
contact_method: The connection type
-
mgr_sudo_user: The user for
salt-ssh -
activation_key: If selected
-
minion_pub: The pre-authorized public client key
-
minion_pem: The pre-authorized private client key
-
proxy_pub_key: The public SSH key that was retrieved from the proxy if the target is an SSH client and a proxy was selected
The roster content contains:
-
hostname -
user -
password -
port -
remote_port_forwards: the remote port forwarding SSH option -
ssh_options: other SSH options:-
ProxyCommandif the client connects through a proxy
-
-
timeout: defaults to 180 seconds -
ssh_pre_flight: The path to the pre flight shell script (default:/usr/share/susemanager/salt-ssh/preflight.sh) -
ssh_pre_flight_args: The list of arguments to call the pre flight script on the client
This image provides an overview of the Salt SSH bootstrap process.
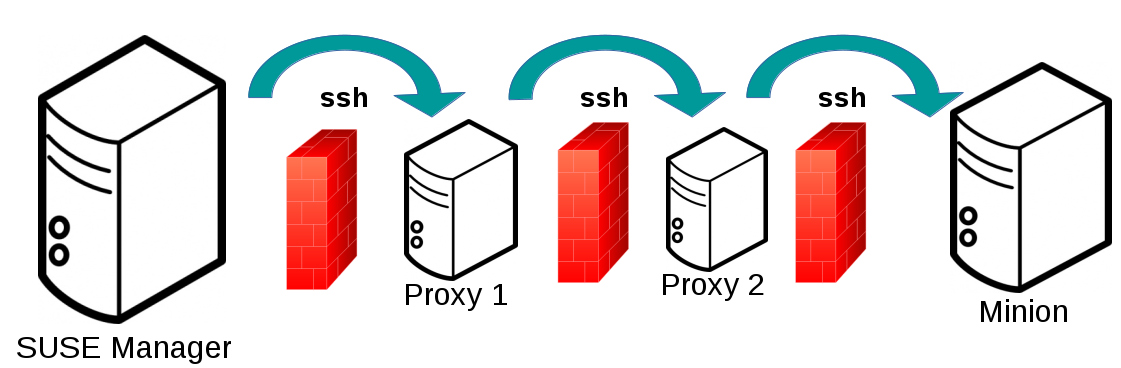
8. Proxy Support
Salt SSH works with Uyuni Proxy by chaining the SSH connection from one server or proxy to the next. This is also known as a multi-hop or multi-gateway SSH connection.
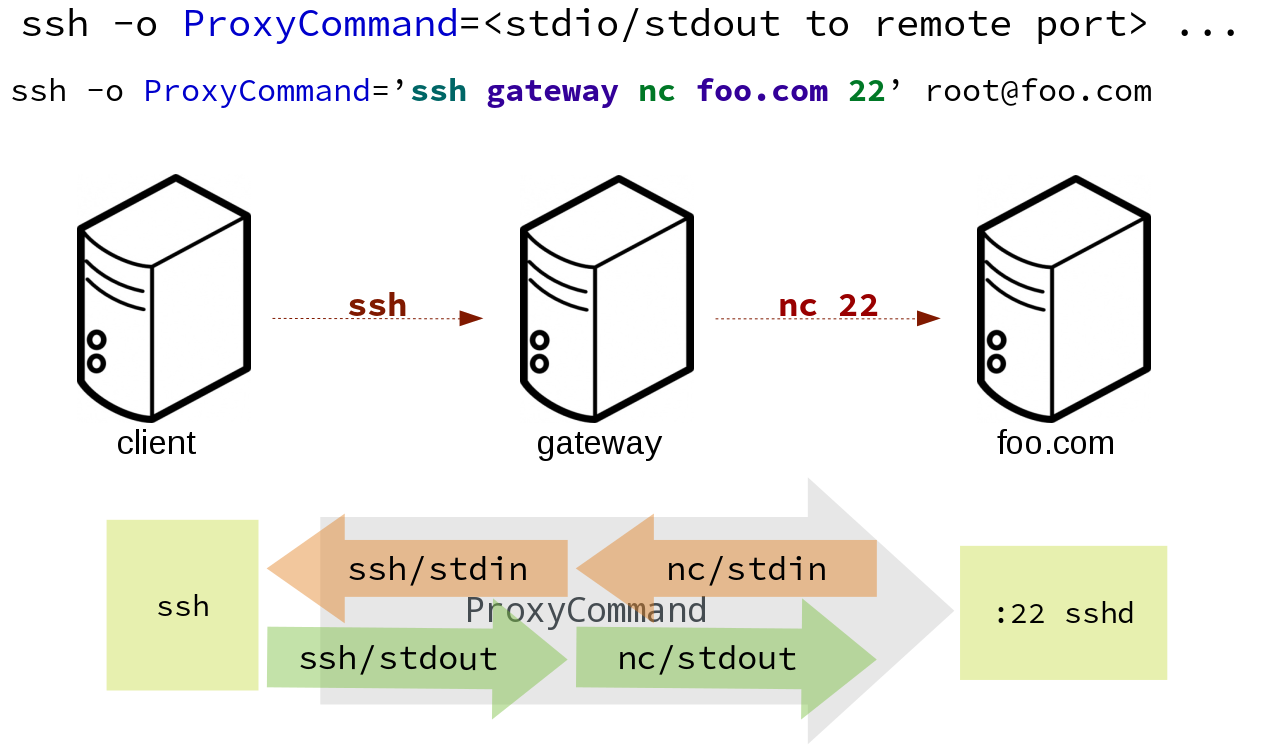
Uyuni uses ProxyCommand to redirect SSH connections through proxies.
This options invokes an arbitrary command that is expected to connect to the SSH port on the target host.
The SSH process uses standard input and output of the command to communicate with the remote SSH daemon.
ProxyCommand replaces a TCP/IP connection.
It does not perform any authorization or encryption.
Its role is simply to create a byte stream to the remote SSH daemon port.
This image depicts a client connecting to a server that is behind a gateway.
In this example netcat is used to pipe port 22 of the target host into the SSH standard input/output:
The Salt SSH calls run in this sequence when a proxy is in use:
-
Uyuni initiates the SSH connection.
-
ProxyCommanduses SSH to create a connection from the server to the client through the proxies.
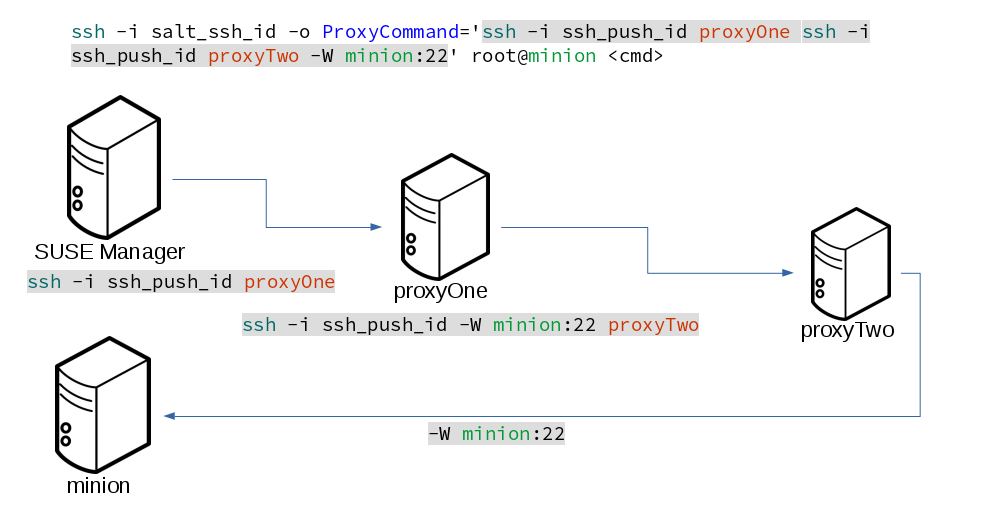
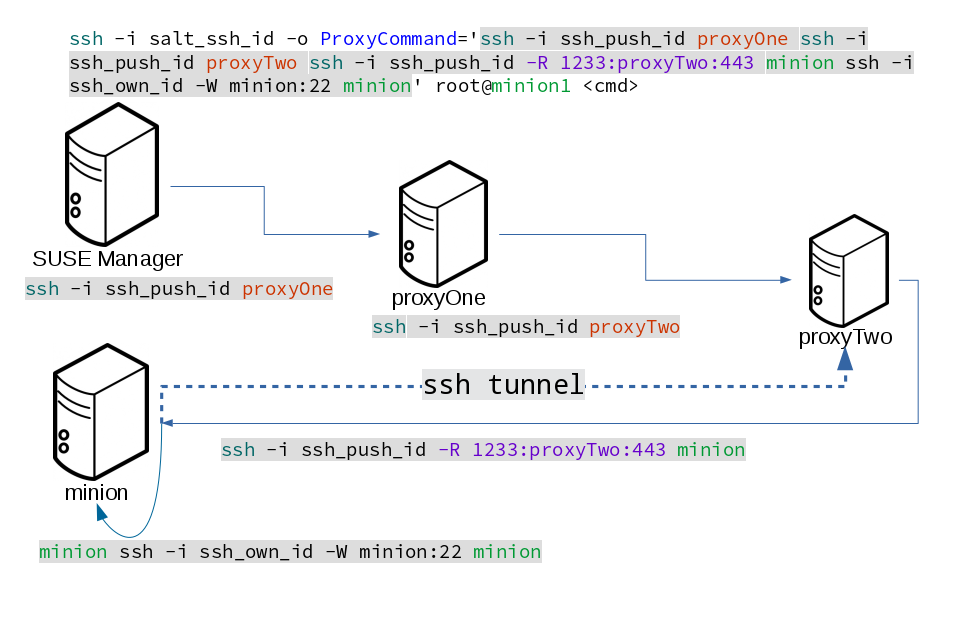
This example uses ProxyCommand with two proxies and the ssh-push method:
# Connect the server to the first proxy:
/usr/bin/ssh -i /srv/susemanager/salt/salt_ssh/mgr_ssh_id -o StrictHostKeyChecking=no -o User=mgrsshtunnel  proxy1

# Connect the first proxy to the second, and forward standard input/output on the client to client:22 using the `-W` option:
/usr/bin/ssh -i /var/lib/spacewalk/mgrsshtunnel/.ssh/id_susemanager_ssh_push -o StrictHostKeyChecking=no -o User=mgrsshtunnel -W client:22  proxy2
This example uses ProxyCommand with two proxies and the ssh-push-tunnel method:
# Connect the server to the first proxy:
/usr/bin/ssh -i /srv/susemanager/salt/salt_ssh/mgr_ssh_id -o User=mgrsshtunnel  proxy1

# Connect the first proxy to the second:
/usr/bin/ssh -i /home/mgrsshtunnel/.ssh/id_susemanager_ssh_push -o User=mgrsshtunnel  proxy2

# Connect the second proxy to the client and open an reverse tunnel (-R 1233:proxy2:443) from the client to the HTTPS port on the second proxy:
/usr/bin/ssh -i /home/mgrsshtunnel/.ssh/id_susemanager_ssh_push -o User=root -R 1233:proxy2:443 client

# Connect the client to itself and forward the standard input/output of the server to the SSH port of the client (-W client:22).
This is equivalent to `ssh ... proxy2 netcat client 22`` and is needed because SSH does not allow both the reverse tunnel (-R 1233:proxy2:443) and the standard input/output forward (-W client:22) in the same command.
/usr/bin/ssh -i /root/.ssh/mgr_own_id -W client:22 -o User=root client
9. Users and SSH Key Management
To connect to a proxy, the parent server or proxy uses a specific user called mgrsshtunnel.
When mgrsshtunnel connects, the SSH configuration of the proxy will force the execution of /usr/sbin/mgr-proxy-ssh-force-cmd.
This is a simple shell script that allows only the execution of scp, ssh, or cat commands.
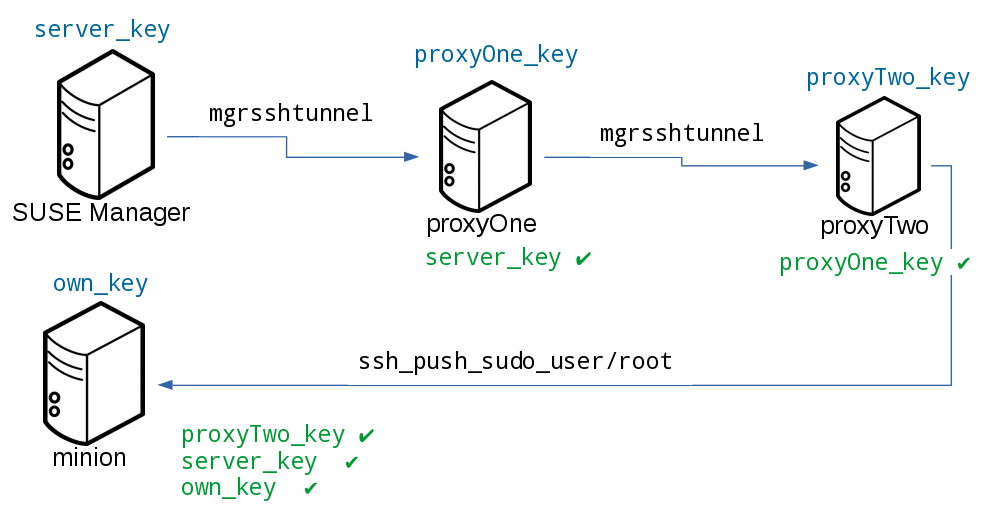
The connection to the proxy or client is authorized using SSH keys in this sequence:
-
The server connects to the client and to the first proxy using the key in
`/srv/susemanager/salt/salt_ssh/mgr_ssh_id. -
Each proxy has its own key pair in
`/home/mgrsshtunnel/.ssh/id_susemanager_ssh_push. -
Each proxy authorizes the key of the parent proxy or server.
-
The client authorizes its own key.
10. Repository Access with a Proxy
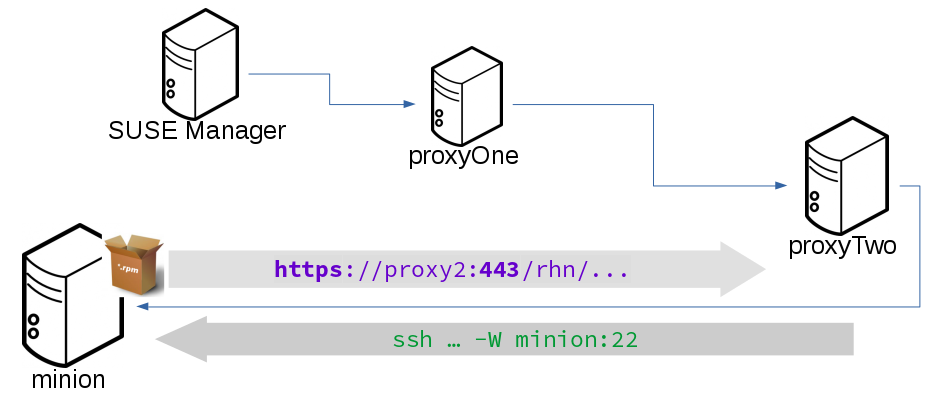
When Uyuni connects to a repository using a proxy, it can use either ssh-push or ssh-push-tunnel.
In both methods the client connects to the proxy to retrieve package and repository information.
In the ssh-push method, the package manager connects directly to the proxy using HTTP or HTTPS.
This works in cases where there is no firewall between the client and the proxy that blocks HTTP connections initiated by the client.
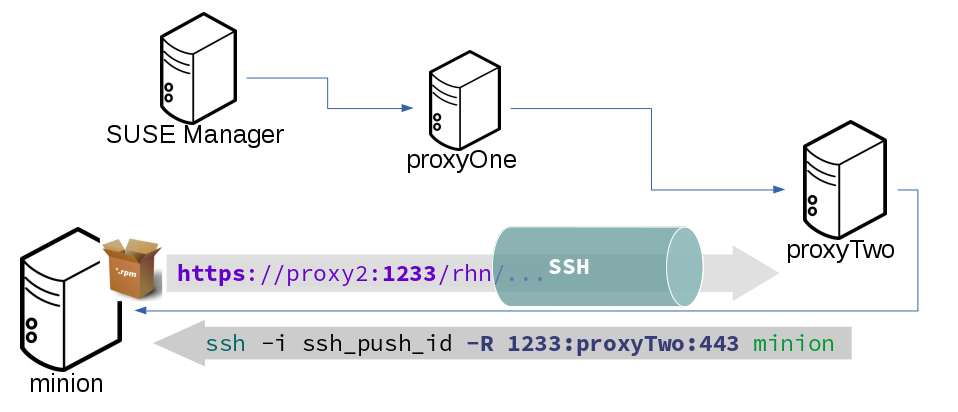
In the ssh-push-tunnel method, the HTTP connection to the proxy is redirected through a reverse SSH tunnel.
11. Proxy Setup
When the spacewalk-proxy package is installed on the proxy, the mgrsshtunnel user is created.
The initial configuration with configure-proxy.sh occurs using this sequence:
-
An SSH key pair is generated, or an existing keypair is imported.
-
The SSH key of the parent server or proxy is retrieved to authorize it on the proxy.
-
The
sshdaemon on the proxy is configured to restrict themgrsshtunneluser. This is done by themgr-proxy-ssh-push-initscript, which is called fromconfigure-proxy.sh. It does not have to be manually invoked.
The parent key is retrieved by calling an HTTPS endpoint on the parent server or proxy.
The first endpoint tried is https://$PARENT/pub/id_susemanager_ssh_push.pub.
If the parent is a proxy then this will return the public SSH key of the proxy.
If a 404 error is received from that endpoint, then the parent is assumed to be a server not a proxy, and https://$PARENT/rhn/manager/download/saltssh/pubkey is tried instead.
If an SSH key exists at /srv/susemanager/salt/salt_ssh/mgr_ssh_id.pub on the server it is returned.
If the public key does not exist because salt-ssh has not been invoked yet, a key will be generates by calling the mgrutil.ssh_keygen runner.
|
Salt SSH generates a keypair the first time it is invoked with |
12. Rotate SSH keys
The SSH key is used on salt-ssh managed systems.
Additionally, it is used on Uyuni Proxies for the user mgrsshtunnel.
Normal systems managed with the Salt default method are not affected and do not have this key configured.
-
On the Uyuni Server, as user
root, change to usersalt:su -s /bin/bash - salt
-
Create a new SSH key:
ssh-keygen -N "" -t rsa -q -f /var/lib/salt/.ssh/new_mgr_ssh_id
-
Copy the public key into the Salt filesystem to make it usable in a Salt state:
cp /var/lib/salt/.ssh/new_mgr_ssh_id.pub /srv/susemanager/salt/salt_ssh/
-
Change back to user
rootagain:exit
-
Rollout the new key to all systems that need it. Applying the
util.mgr_rotate_saltssh_keystate will limit the changes tosalt-sshmanaged systems and proxies:salt '*' state.apply util.mgr_rotate_saltssh_key mgr-salt-ssh '*' state.apply util.mgr_rotate_saltssh_key
-
Move the old key away and make the new key the standard key. Rename
mgr_ssh_idkey todisabled_mgr_ssh_idandnew_mgr_ssh_idkey tomgr_ssh_idin the SSH keystore of the usersaltas well as in the Salt filesystem for the public keys:su -s /bin/bash - salt cd .ssh mv mgr_ssh_id disabled_mgr_ssh_id mv mgr_ssh_id.pub disabled_mgr_ssh_id.pub mv new_mgr_ssh_id mgr_ssh_id mv new_mgr_ssh_id.pub mgr_ssh_id.pub cd /srv/susemanager/salt/salt_ssh/ mv mgr_ssh_id.pub disabled_mgr_ssh_id.pub mv new_mgr_ssh_id.pub mgr_ssh_id.pub
-
OPTIONAL: When containerized proxies exist, re-create the configuration to get the new SSH key into the proxy configuration. Restart the containers with the new configuration. It is also possible to change the existing configuration on the podman host (
ssh.yaml). Change the value ofserver_ssh_key_pubwith the content of the currentmgr_ssh_id.pub. -
To remove the disabled keys from the
authorized_keys` files of the [literal]salt-ssh`` managed systems and the proxies, apply the state a second time:salt '*' state.apply util.mgr_rotate_saltssh_key mgr-salt-ssh '*' state.apply util.mgr_rotate_saltssh_key